


While using pictures in designing we often don't require certain parts of a picture to be seen, or else, just need a particular part of a picture. For this we can use the Feather effect of Fireworks. Basically feather removes the otherwise jagged finish to an edited image by giving it a fading in pixel radius. This cool effect makes your pictures stand out and look really professional. There are three different methods to feather your image. They are listed below:
Method 1: Magic Wand Tool
In this method you are going to feather an image using the Magic Wand Tool. This method is helpful when the image background is almost consistent and the part needed stands out. In the below example the background color is black so we easily seperate the picture of the girl from it. Basically we will remove the unwanted parts of the image with the magic wand tool and then smooth out the jagged finish with the eraser tool. This cool effect makes your pictures stand out and look really professional.
- Open a new Fireworks file and go to File >> Import (Ctrl+R) the image you would like to place in the design. Our example is shown below:
- Select the background black area that you would like to delete using the Magic Wand tool
 and adjust the Tolerance level as 9 and Edge as Anti-alias. Tolerance represents the tonal range of colors that are select when you click a pixel with the magic wand tool. The Tolerance level is displayed in the Properties Inspector (Window >> Properties). After selecting the area satisfactorily, delete it. See the illustration below that will show how to set the tolerance level:
 - Once you have deleted the unwanted area you should get an image similar to the one shown below, the edges will be jagged and uneven.
- Now we need to smooth the edges using the Eraser Tool
 . Use the round eraser with some opacity (e.g. 50) and edge softness (e.g. 10). The image above shows how the edges are smoothened with the eraser tool and the final smooth edges image is shown below.


See how we have used this image in our CSS website design tutorial.

Handy Tips:
- Clean the image at a higher resolution than you need. This will ensure that the effect looks sharp when you reduce its size.
- Always save your neatly extracted images for future use or reference.
Method 2: Convert Path to Marquee Technique
In this method you are going to learn how to feather an image using the Convert Path to Marquee method. The steps are given below:
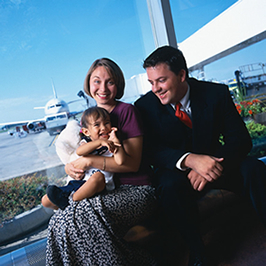
- Step 1: In Fireworks, Import (Ctrl+R) an image you would like to edit. Our example is shown below:
- Step 2: Using Pen Tool
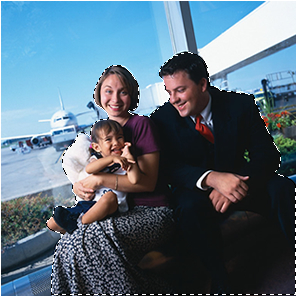
 select/draw the particular object that you like to edit. In the above image we are going to edit the family. See the illustration below that will show how the family is selected using the pen tool:
 - Step 3: Click on the path, then go to Modify >> Convert Path to Marquee and select the Edge as Anti-alias. The marquee will look as below:
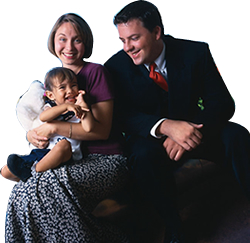
- Step 4: Once you have drawn/selected the area, check if the selection is what you want deleted. If not, that is, the selected area is what you would like to keep, then right click the area, from the list select Modify Marquee >> Select Inverse (Ctrl+Shift+I). Now delete the selected area. The image will look as below:

Method 3: Lasso Tool Technique
Let us see another method of image extraction: using the Lasso Tool. Follow the steps given below:
- Step 1: In your Fireworks PNG file, ready the original image you would like to edit. Our example is shown below:
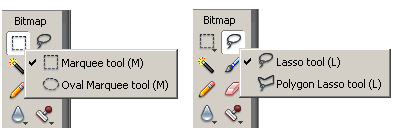
- Step 2: Select the area that you would like to feather using one or more of the Bitmap Tools (the 4 shown below and the yellow magic wand below the marquee tool). The Lasso tool and the magic wand (selects one colored section it is clicked on) are very useful for fine tuning your outline.
- Step 3: Once you have drawn/selected the feather area, check if the selection is what you want deleted. If not, that is, the selected area is what you would like to keep, then right click the area, from the list select Modify Marquee >> Select Inverse (Ctrl+Shift+I).
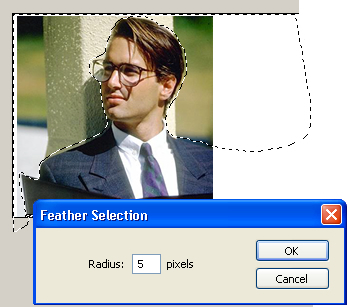
- Step 4: Now you are ready to apply the feather. Right click on the selection once again, and from the pop-up list select Modify Marquee >> Feather. Give the feather radius in pixels (less for sharper feather and more for increased fading). Take a look at the screen-shot below to see this step:
- Step 5: Now click delete to remove the unwanted (selected) area and your remaining required picture will be feathered nicely.

Note: Keep the shift button pressed if you want to do multiple selections within the image and keep the Alt button pressed if you want to subtract the selections within the image.
Handy Tips:
- For a sharper finish give a feather radius 5 and click delete twice.
- For extra fade (useful in collages) try a feather radius 30.

